Purple Play & Sock Silliness

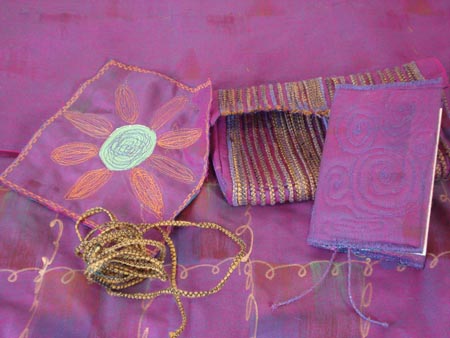
I live not far from Hounslow, Middlesex. It is a mini-mini-mini Southall. By that I mean that it has a high Asian population and consequently a good few shops full  of Asian goodies. One of these shops sells fabric, much of it with a great bling factor and even better than that there is usually some very cheap fabric to be had. The downside is that I never really NEED any such fabric but of course I can’t resist a rummage in the remnant bin or the purchase of “just one metre” of this and that. So it was that a few years ago I acquired this purple fabric.
purple-play1

If you look at the bottom of the photo you will see the front of the material. It really is a bit too much for me to think of anything to use it for and so it has languished in various bags, piles and heaps since it came home with me.

For a while I have been considering that the back of the fabric would be more useable even though those gold squiggles show through in places. My scissors first cut into two pieces that I sandwiched together with some wadding to make a cover for a notebook. I also sewed in two bookmarks made from wrapped yarn. I used a length of red yarn and machine wrapped it with red bobbin thread and blue top thread.

My second piece of purple playfulness was the unfinished clutch bag in the middle. I bought some bondaweb with the idea that being double-sided I could fuse it between two layers  of the fabric and it would also give it some substance. I don’t know what I was thinking of because of course the bondaweb is so gossamer-like that once the two protective layers are removed  there was no substance left. I probably should have abandoned the project there and then but I’m not like that. I enjoy messing around. So I picked up my second attempt at wrapped thread that had turned out to be what I grandly call “antique gold”. I then began to sew strips of this wrapped thread all over the cut out & sandwiched fabric pieces (one body +flap piece and two gussets). Soon they began to act rather like a corset and when I sewed the pieces together into the bag shape it was more or less self-supporting. Now I think that I will I have to line it somehow and I’ll probably use a double or triple length of the remaining wrapped thread for a strap (even though clutch bags don’t need a strap).

Moving on to the SOCK SILLINESS …
sock-quilt1

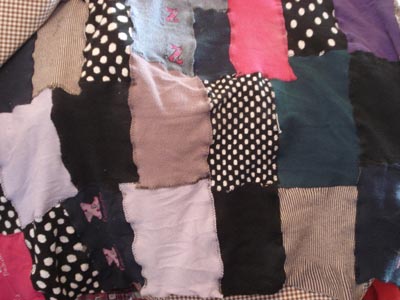
I have my father’s big toes. They seem to have a life of their own and though I don’t ever feel them at it, I know that they wriggle and jiggle all day inside my shoes. How else would I have one giant hole in each toe of nearly all of my socks. Yes, I do know how to darn and I do darn although most of my socks are a cotton mix and don’t accept a lot of darning or in my case, major reconstruction, as well as wool socks do.  A week or two ago I was being all New Yearish and I emptied and sorted my sock drawer. I had no idea how many pairs of socks I had  because quite honestly I ran out of fingers and toes (big or small) to count them on. I took a deep breath and decided to throw out all those socks that had darns on the darns or were in urgent need of such. The pile was mountainous and I just couldn’t bear to throw them out. I had several pairs of spotty, dotty socks and many with stripes. I have a weakness for both. So .. I cut off the damaged toes, the heels (which  are the most three-dimensional part of the sock) and the cuffs. This resulted in two “tubes” per sock and I cut down each down the length resulting in a flat pirce of sock fabric. Then in a very haphazard way I zig-zagged the pieces together. Now what on earth have I ended up with …. a squilt? And what on earth do I do with this “squilt”?

Finally … on the left …. two more pieces of the fabric, right bright sides together. The flower’s centre made from a green foil wrapper from a chocolate (“borrowed” from the Loom Monkey’s magpie stash of “useful things”) and the orange petals machine embroidered. Finally I stitched a decorative machine-embroidered border around the edge of the piece sandwiching the two pieces of fabric together.
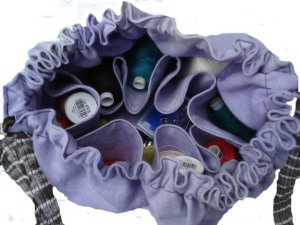
It’s All in the Bag (almost a tutorial)

An idea of how to make a circular drawstring sewing bag

I thought I’d have another go at making a drawstring sewing bag and this time take a couple of photos to explain what I mean.

The basic requirements for this little bag are:

. 2 lined circles, one bigger than the other,

. cord or ribbon for the drawstring

. 2 large beads or buttons or some extra fabric to sew on the ends of the drawstrings

The circles have to be quite a bit larger than I imagined. I suggest drawing around a dinner plate for the SMALLER circle and one inch outside the dinner plate for the larger (outside) circle.

1. You will need to cut 2 of each of the 2 circles so you will end up with 4 circles, 2 big and 2 slightly smaller.

2. Sew all around the SMALLEST circles (right sides together) with approx a 1/4 inch seam EXCEPT FOR A GAP OF ABOUT 3 inches that you will need to turn the circle inside out. Turn this small circle inside out, press and then top stitch near the outside edge carefully closing the opening by neatly tucking the seam allowances inside. Put aside.

3. Sew the 2 LARGEST circles right sides together. you will need to leave approx a 4 inch gap for turning AND ALSO 2 one-inch gaps, opposite each other to use to thread the drawstrings through.

Turn this LARGE circle inside out and press. Top stitch around edge, EXCEPT for 2 one-inch gaps using the topstitching to neatly close the 4-inch turning gap.

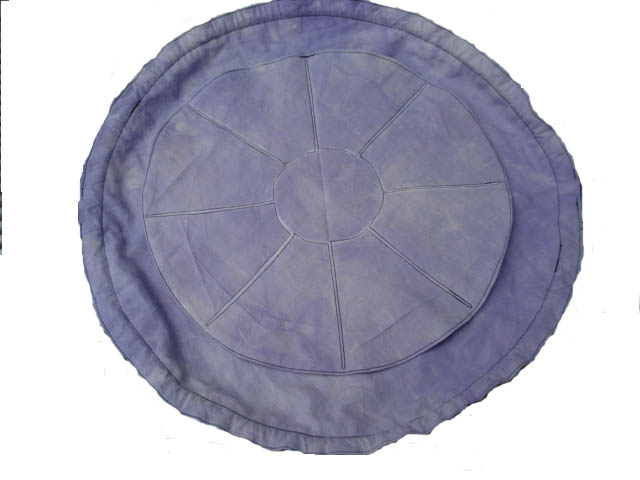
4. Fold the SMALL circle in half and iron to press. Fold in half again & press with iron, and fold in half one more time and press again. Open up carefully and you should have folds that divide the circle into 8 sections. Using tailors chalk or ordinary blackboard chalk draw over these folds so that your circle looks like a cake cut into 8. (see first photo at top of page). Find a small circle (e.g a glass) to draw around in the centre of this circle (see above). This will look like the centre of a flower with 8 petals around it.

5. Place the SMALL circle on top of the LARGE circle equally (see photo above). Place a pin in the middle. Carefully pin in between each line so that you will be able to sew along both sides of each line.

6.Starting at the outside of the small circle, sew down the right-hand side of the chalk line till you meet the centre drawn circle, sew along the curve of this centre circle till you meet the next line. Sew along the nearest side of the next chalk line (towards the outside of the circle of fabric) and then back down alongside it until you meet the centre circle again. Sew along that section of curve and up one side of the next chalk line etc etc until you finally arrive back at where you started. ALL THIS STITCHING WILL SHOW THROUGH ONTO THE OUTSIDE OF YOUR BAG. These lines of stitching make eight small interior pockets for reels of thread etc.


7. Back on the largest circle, sew a second line of stitching one-inch inside your outside line of stitching (do not leave any gaps in this stitching.

8. With a safety pin, thread a long drawstring (longer than the circumference of your circle) in through one gap, all way around the circle and back out where it entered. Starting at the OPPOSITE gap, thread another long drawstring through the other gap, all around the casing and back out where it entered. You need to knot the paired ends of drawstrings and either tie a large bead or button through and knot securely so that they don’t disappear into the gaps or, do as I did and, sew each pair of ribbon ends into a piece of doubled-over fabric and stitch quite a few times to secure the ribbon inside the fabric. On reflection it would have been neater to make triangular-shaped “ends” to sew the drawstring/ribbon into.

I’m quite pleased with this bag apart from the fact that the inner circle shouldn’t have been so much smaller than the outer circle.Next time I will make them with probably only one-inch in difference between the two circles.

Somehow I should be able to make a circular pincushion that is permanently attached to the “flower centre” inside the bag.

It also needs an attached needle-case and attached small scissors holster.